 |
| Final Gift Bag |
I really like to crochet practical items beyond wearables. Sometimes, I find myself in need of a gift bag and with plenty of balls of yarn around, I just don’t think it’s practical to run out to Walmart and get another 3 dollar paper bag when I can create something with love that is reusable and will be more appreciated than the cheap folded paper bag. I find it is good to make a few up in your spare time to have on hand for those “just in case” moments.
The following is my pattern to create a gift bag. The bag itself measures about 4 and a half inches wide and you can make it as tall as you like. The ruffle on top measures just over 1 inch.
I hope you enjoy the pattern and find that it serves a great purpose in making those little gifts even more special.
—————————————
SMALL OVAL GIFT BAG
By Cris
Hook Size: G
Yarn: Yarn does not matter; however, I am using Red Heart Soft in Leaf Green for this demonstration.
– 1 skein of Red Heart Soft yarn in Leaf Green = bag color (you will not use a full skein, a large ball of yarn would suffice)
– small scraps of yarn (enough to make 2 chains 12 inches in length OR 2 pieces of ribbon. If using yarn, you can use the leaf green or a color complimentary to the bag color
NOTE: You only turn your work once with this pattern. Do not turn your work when going row to row until the instructions tell you to do so.
Abbreviations:
ch = chain
sk = skip
st = stitch
sl = slip stitch
sc = single crochet
hdc = half double crochet
dc = double crochet
—————————————
Bag
ch 15 using the leaf green yarn
Row 1
sc in 2nd st from hook
sc down the row to the first st of the starting chain (14 sc at this point)
sc 3 more times in the first st of the starting chain
13 sc down the other side of the starting chain. Do not turn your work, just work down the opposite side.
sc 3 more times in the last st you put an sc into
sl to join
Row 2
ch 1
13 sc, 3 sc in next 2 st
15 sc, 3 sc in next 2 st
sl to join
 |
| the base after row 2 |
Row 3
ch 1
16 sc, 2 sc in next 3 st
18 sc, 2 sc in next 3 st
2 sc
sl to join
You should now have a nice oval. We are going to start working upwards to build the sides of the bag.
Row 4 – work in front loop only
ch 1
hdc in all st around
sl to join
Row 5 – worked standard; through both loops
ch 1
hdc in all st around
sl to join
Row 6
ch 2
dc in all st around
sl to join
Row 7 to 14
Repeat rows 5 and 6 a total of 4 times (row 7=hdc, row 8=dc, row 9=hdc, row 10=dc, row 11=hdc, row 12=dc, row 13=hdc, row 14=dc)
NOTE: you can make the bag longer or shorter by increasing or decreasing the number of times you repeat rows 5 and 6. No matter what number you choose to repeat, end on a row of dc.
Row 15
ch 1
hdc in all st around
sl to join
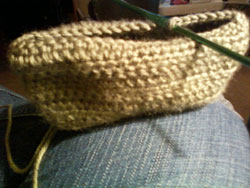
 |
| After Row 16 |
Row 16
ch 3
sk st, dc in next st
*ch 1, sk 1 st, dc in next st*, repeat between * until you are at the end, sl to join
Row 17
ch 1
sc in all st of the previous row (top of dc and into ch space)
sl to join
Row 18 and 19
ch 1
put 2 sc in all st of previous row
sl to join
Row 20
ch 1 and turn your work
*sl in next st, ch 1*- repeat between * all the way around the bag
sl to join
cut the yarn and tie off
Weave in the 2 tails (top of bag and bottom)
Ties
For the ties, use a few feet of the same yarn used for the bag or a complimentary color. For my demonstration bag, I am making the ties out of Red Heart Soft in the color “honey.” You can also use ribbon in place of yarn ties.
Make 2: ch 50 and tie off
Assembly
 |
| Tie a knot in the tails |
feed the tail of one of the chains into a yarn needle. At the side of the bag, feed it into the dc row that has the ch spaces. weave it up and down around the dc posts until you make your way back to the side of the bag you started on. You should come out on the space right next to the one you went into the bag on. Tie a knot in the tails so the knot is where the ch starts on each side.
You can tie a little bow to make it look nice. If you do tie a bow in the tails, make it a double knot to ensure it does not come untied.
Before cutting the tails to a shorter length, tie a knot in it and cut below the knot in the yarn.
Repeat for the 2nd tie only come in on the opposite side of the bag.
Pull each tie so the knotted side is up against the bag and the other side (a solid piece of the chain) is what can be pulled on.
When you are done, you will have a drawstring tie for your bag.


Debs Crochet
April 19, 2011 at 1:53 pm
Very nice. Thanks for sharing.